So, you want to learn how to add a podcast to your blog? Here’s a 3,000-word guide that might help with that.
Podcasting is now serious business and, for many bloggers, the traffic from search engines like iTunes is catching up to the likes of Google. Supplementing your regular written content with an audio podcast show can be a very smart idea.
The problem is that setting up a podcast is a confusing process and can take a really long time if you’re new to this type of thing.
In this post I’ll go through all the steps you need to set up a podcast from your blog as quickly as possible. Hopefully this will save some people some time and frustration.
Let’s take a look!
The quick steps for adding a podcast to your blog
Here is a brief overview of how to add a podcast to your blog:
- Check your blog’s suitability for podcasting
- Get the right microphone and recording software
- Install the necessary plugins and configure the back-end
- Create your podcast’s artwork that appears in iTunes
- Record, upload, and publish your first episode
- Submit your new podcast to iTunes
- Promote your podcast
The content below is going to go into all the detail for the points above. As mentioned, it can be a bit of a nightmare so make sure you follow closely. As we say a lot here on Blog Tyrant – don’t worry about getting it perfect. Let’s just get it started!
1. Check your blog’s suitability for podcasting
Before you go down this path it’s important to establish whether or not your blog is both technologically suitable and creatively suitable for hosting it’s own podcast show.
Technological suitability
While a lot of people reading this will have their blog on a free provider, I highly recommend using a self-hosted WordPress blog with your own domain name.
The reason this is relevant for podcasting is because the plugins that are available for WordPress users make the process much, much simpler as well as giving you control over things like feeds, artwork, content delivery, and much more.
It has always been my opinion that if you are going to start a blog or podcast and work on it like a business then you should treat it like a business in all forms. Part of that means having a set up that you fully own and control, while at the same time giving you the best power and flexibility.
For this reason the rest of this tutorial will be based around setting up your podcast on a WordPress blog. I’m still convinced this is the best way.
Creative suitability
The next thing I wanted to mention before diving into the main set up process is that it’s important to have a really solid idea for your podcast that will both help people and sustain a topic for a good length of time.
If you take a look at 90% of the most popular podcasts you’ll notice that they all try to make the world a better place, and they all do that in their own little way. This American Life, for example, regularly looks at issues facing ordinary Americans and presents solutions and outcomes that might help listeners. NPR Politics does the same thing in the political arena.
So, before you start out on your podcasting journey I encourage you to make sure you have a really clear concept about who you are trying to help, and how you are going to do that. Think about the format of the show, the guests you might have, the problems you might address, and really try to find interesting ways to solve the problems in your niche.
Once you’ve done that, you’re ready to start installing stuff! Oh, and here’s my attempt.
2. Get the right microphone and software
What microphone is best for recording a podcast? What about the software I need to save the files?
These two questions are usually the first things bloggers ask about podcasting.
As you can imagine, the options in this area are almost limitless and as such we need to just go over a few good and reliable products that are good quality and not too expensive. That way we avoid extensive and crippling research that can take days or even weeks.
What microphone should I get?
The good news is, you don’t need to spend thousands of dollars to get a decent set up. Especially in the early days, it’s entirely unnecessary to go overboard on the budget.
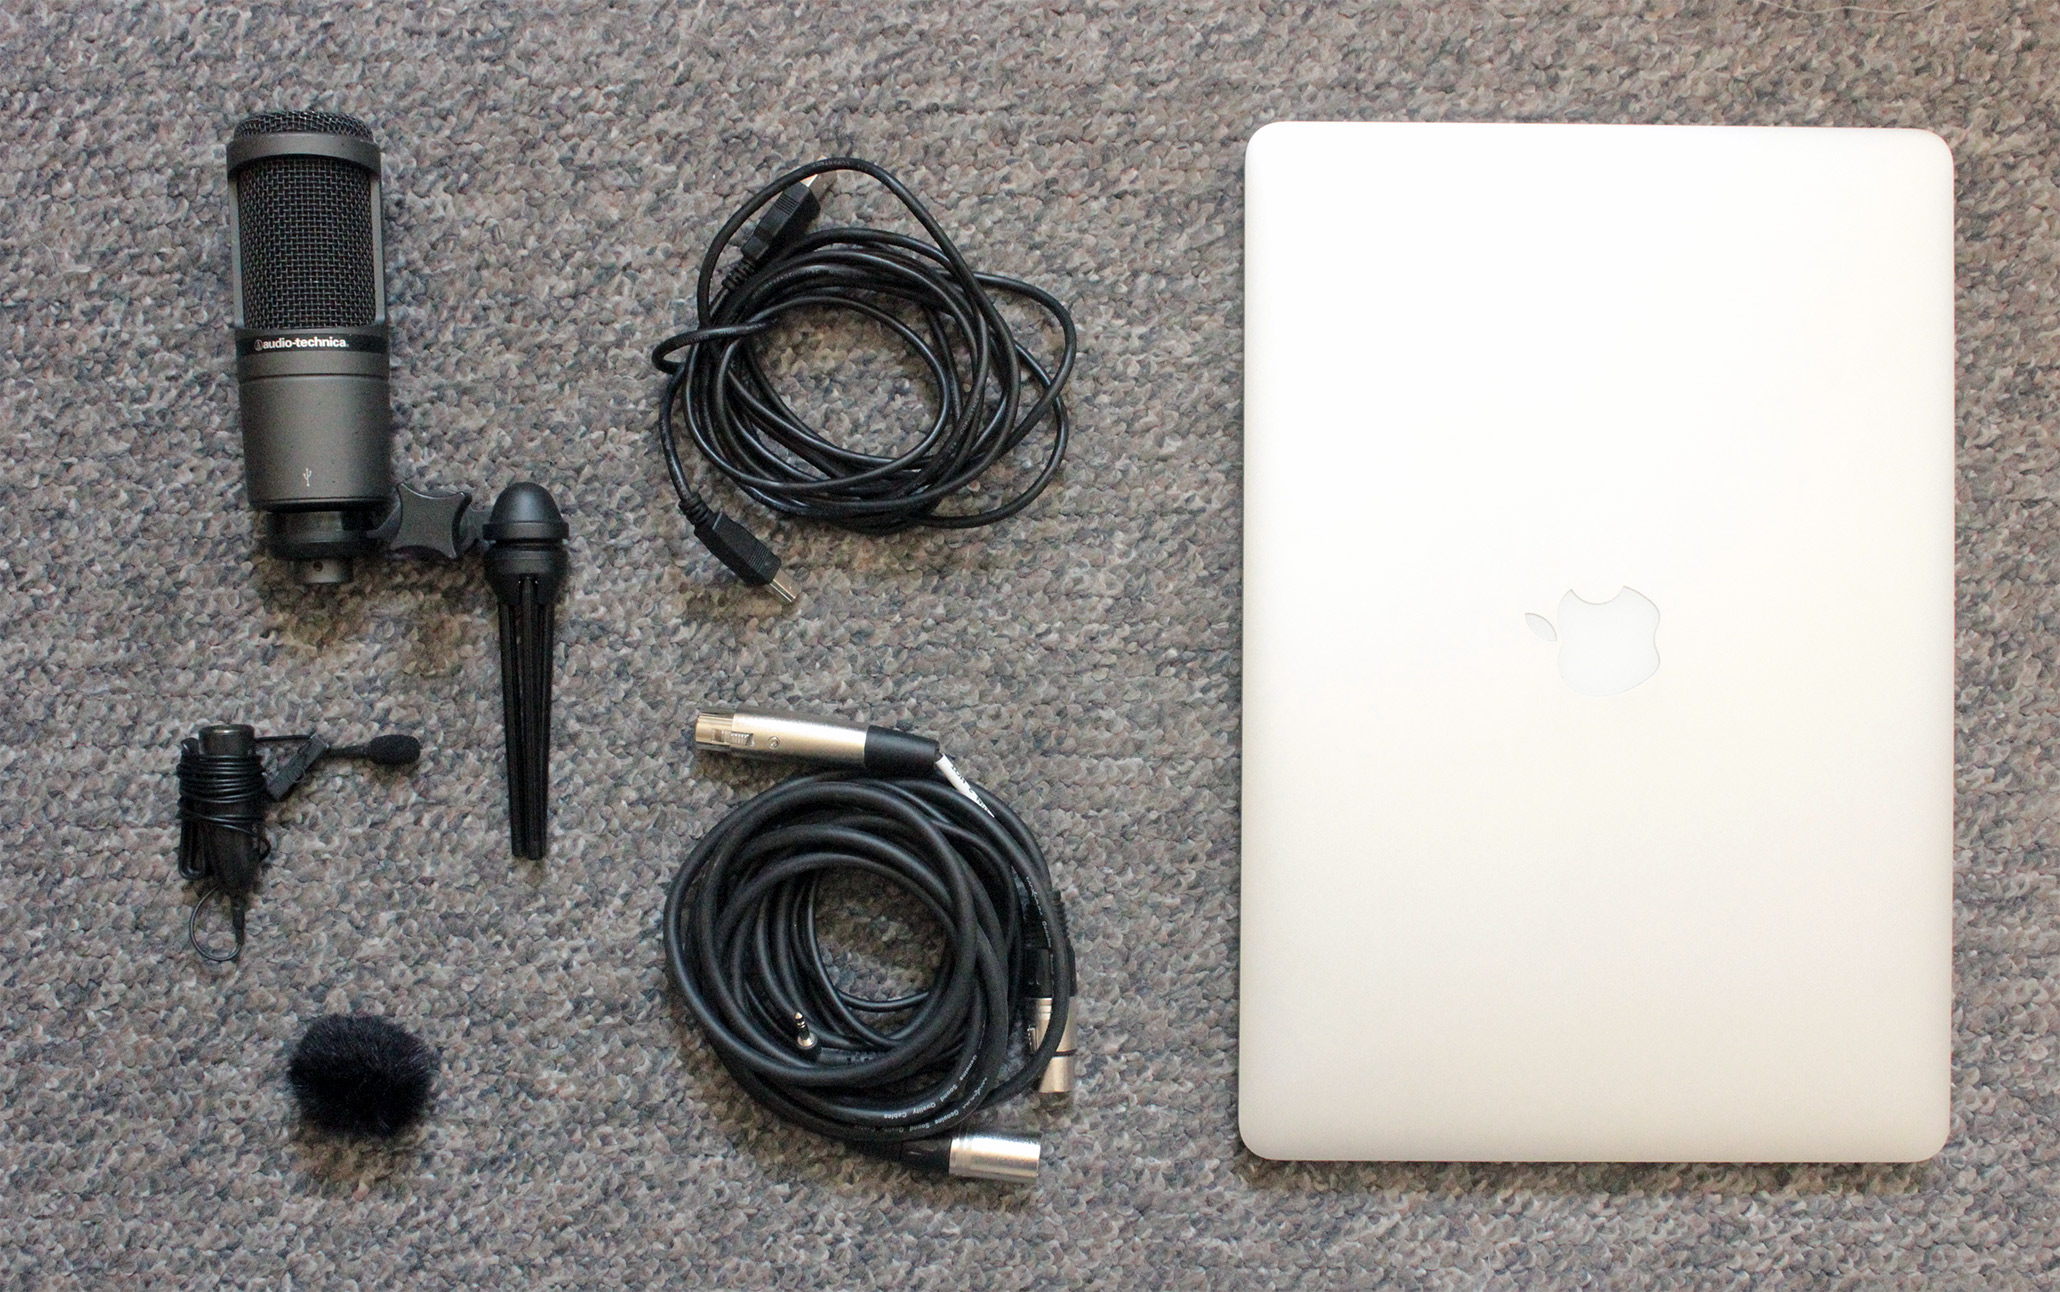
A very basic podcasting set up with USB mic, lapel mic, laptop, and an old carpet.
My own podcasting is done with a simple Audio-technica USB mic that I bought on Amazon and my laptop. And while the sound is not at NPR quality, it is more than enough for my needs and the needs of most beginners. A lot of bloggers start off with the Blue Yeti which will set you back about $100 and puts out decent quality sound.
Cheaper microphones like these have advantages and drawbacks. For example, mine records lovely sound quality but will pick up anything within 20 feet as loud as if it’s right next to the unit. In the past I’ve had to switch the fridge off to record!
Sound recording can be a really complicated and technical so it’s best to start off with something good but not perfect and slowly work at getting more professional if and when your podcast becomes more popular. Check for good reviews and make sure it is the type of mic that plugs in to your laptop.
What recording software should I use?
The next step is to get a program that allows you to record and edit your podcast episodes.

Inside Audacity. The bottom line is an intro file, the top is the episode.
When it comes to sound recording you’re going to face a little bit of a learning curve, sort of like when you first started a blog. There’s lots of new buttons and sometimes you have no idea what’s going on.
If you have a newer Mac or PC you probably have some inbuilt software that will allow you to record a podcast pretty easily. My preference, however, is a free and open-source program called Audacity that is designed to very simply record, edit and save sound files.
My main tip here would be to not pay for any software and instead play around with the podcast recorder on your computer and then download Audacity and see which one you prefer. Again, it’s not necessary to spend money here.
3. Setting up the back-end of your blog for podcasting
The next step is to set up your podcast at the back-end level of your blog. Unfortunately, this is where it can get a little big confusing.
So how does it work?
Essentially a podcast is just a sound file (like an MP3) embedded in a blog post. That blog post is then part of a feed that is picked up by iTunes so that people can be notified of new episodes on their smartphones. What we are doing at this stage is installing a plugin that neatly sends iTunes all of that information automatically.
If it sounds confusing don’t worry too much. All you really need to know right now is that you don’t actually upload your sounds files to iTunes directly but rather create a place/function on your blog so that iTunes knows where to find your podcast episodes.
The first step is to download the Blubrry PowerPress podcasting plugin and install it on your blog. You can do this by logging into your WordPress blog and going PLUGINS > ADD NEW and then using the search function.
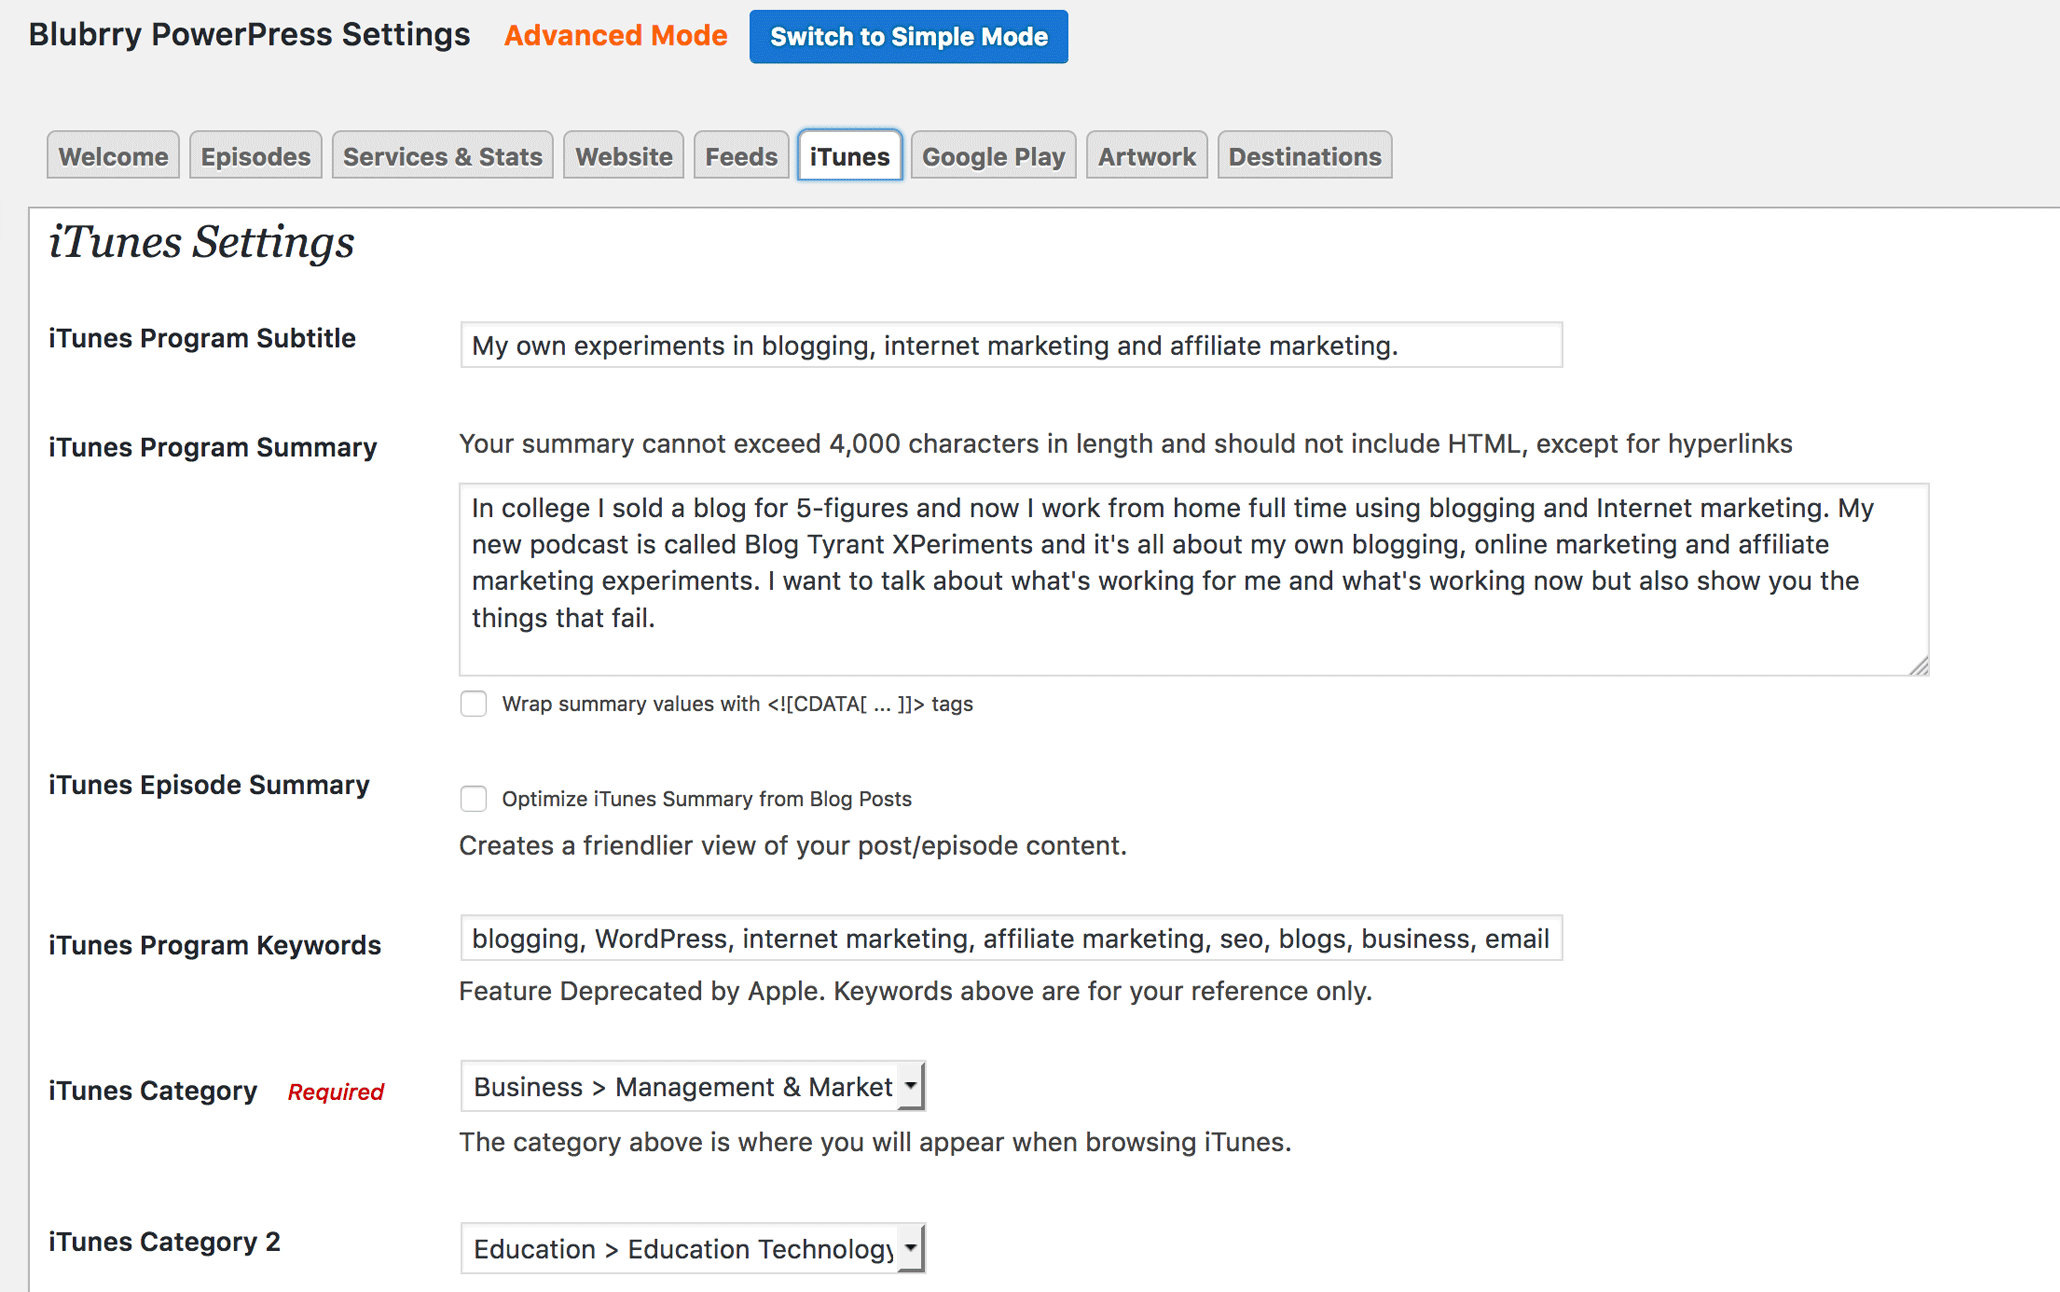
One of the pages inside Powerpress that allows you to create a podcast from your blog.
Once you’ve installed the plugin you’ll get a choice to use a Simple or Advanced Mode of the plugin. For most bloggers the Simple Mode will be sufficient. The Advanced Mode, however, gives you a few more options and allows you to create separate feeds so that, if you wanted, you could run more than one podcast from your blog.
Now, there are dozens of settings to go through here, but the main thing you want to understand is the relationship between your blog’s regular feed, your new podcast feed, and how the plugin lets you configure all of that. I’ve done a short video to cover the main points.
Go through and copy what I’ve done in terms of filling out the areas like iTunes show name, description, category, keywords, etc.
As I said in the video, this was not meant to be a setting-by-setting walk through but rather a quick overview of how the plugin allows your blog to also publish a podcast. If you get stuck on any settings make sure you check out the set up guides provided by Powerpress.
4. Creating your podcast artwork
The artwork that goes along with your show is really important.
Just like with your blog, standing out from the crowd is vital if you want to cut through the competition and get some traction. The way you create your show art and the styles and elements you choose will have a huge impact.
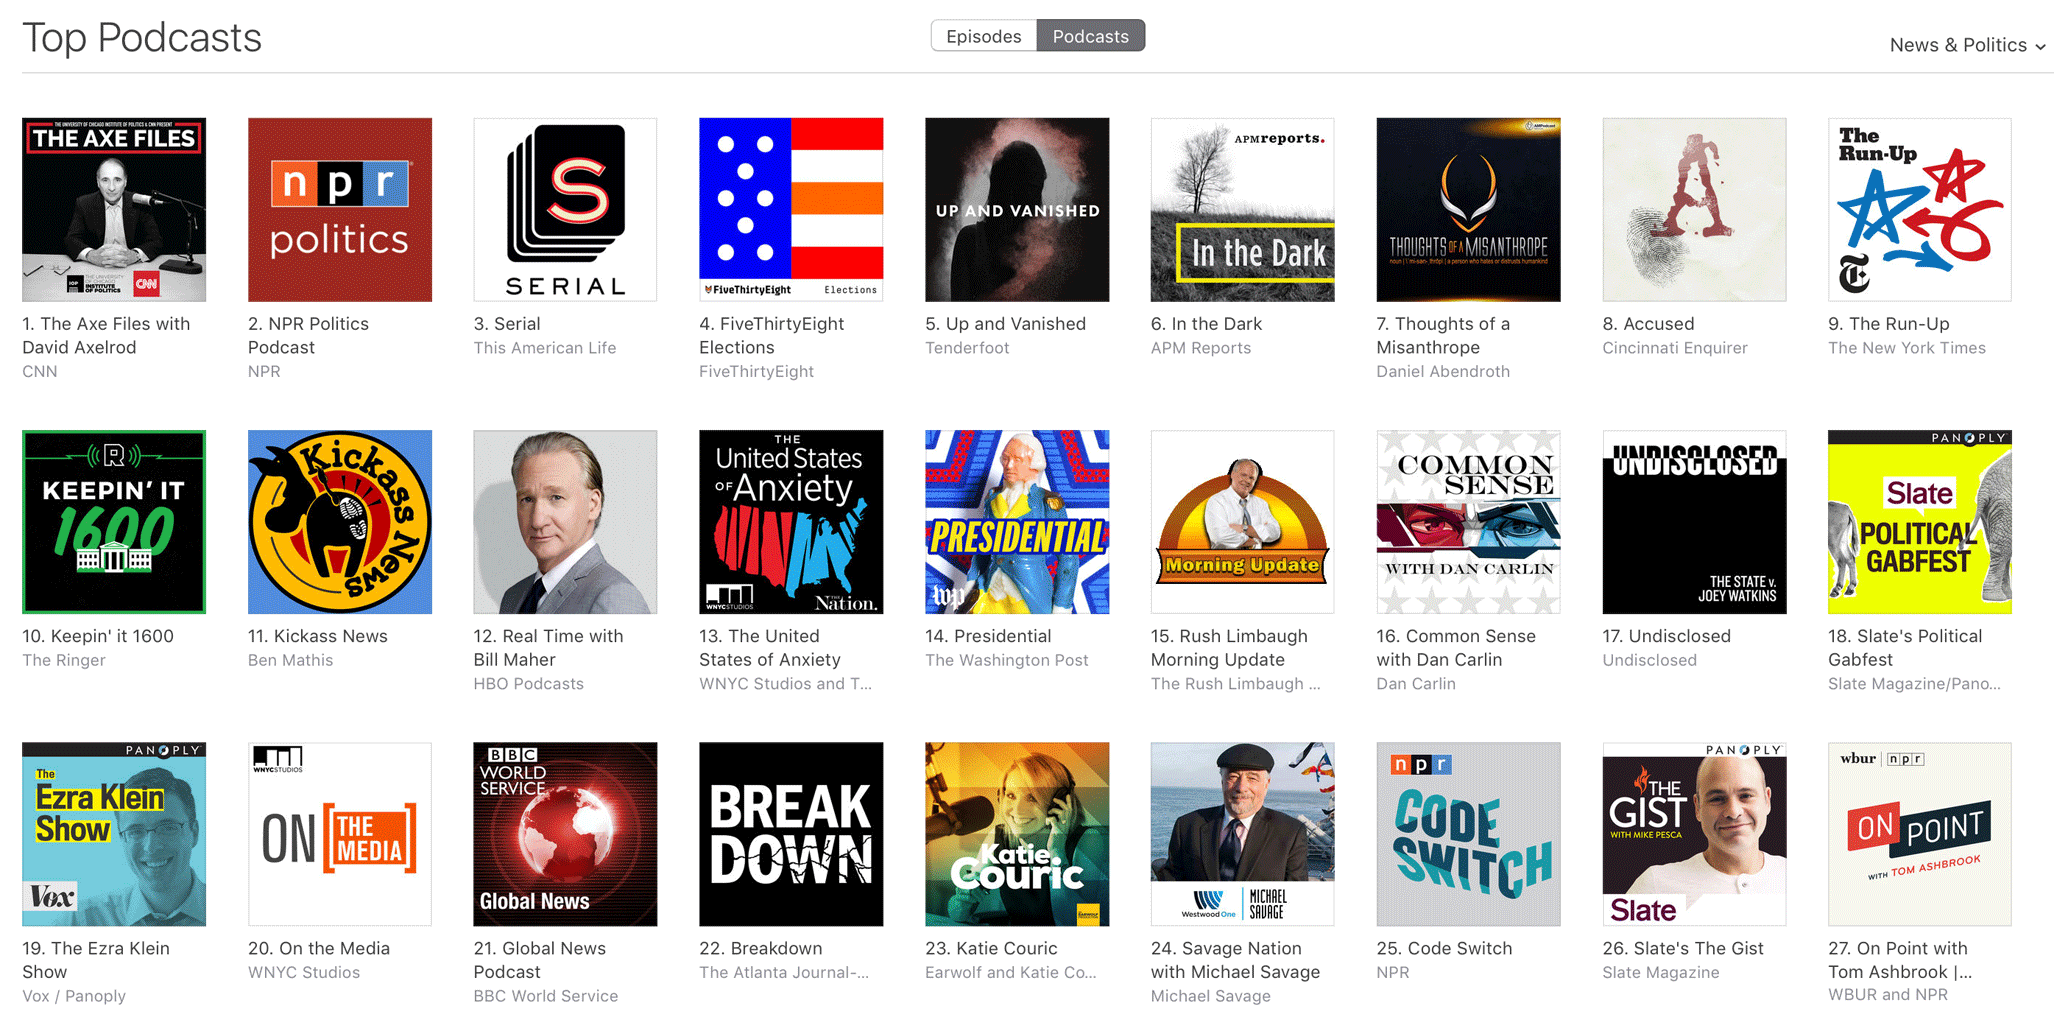
The current top podcasts in the News and Politics section. Which one stands out most for you?
Have a look at the top shows for the News and Politics section and you’ll see an interesting mix of faces and graphics with no faces but large, heavy text and colors.
If you already have a well known brand it can be a good idea to make that the main feature. If not, a lot of studies have shown that people respond better to human faces then graphics.
Your image needs to be 3000 pixels x 3000 pixels in order to account for retina display screens while still being visible at smaller sizes.
You can create your image in Photoshop or Pixelmator, but I would highly recommend creating a contest on 99designs so as to get a professional to create something amazing. I wrote about how I did that in this post on blog images.
Once you’ve created the artwork, upload it to your blog and then add it to the “Artwork” section within the Powerpress plugin as shown in the video above.
5. Record, save, upload and publish your first episode
Before you can submit your podcast to iTunes you need that podcast feed to become active. And for that to happen you need to publish your first episode.
There are a few tricky steps in this section but, once you’re done, you’ll find the whole thing is easier because the main set up stages are done forever and from here on in you just have to create content.
Recording your first episode
Prepare for recording by making notes on your content talking points and setting yourself up in a quiet room with no distractions. Turn off your phone and make sure you don’t have any computer notifications that might pop up on the screen or make a bing.
Once you’re ready, open up Audacity and test your microphone settings. You can record a few 10 second clips and play them back to yourself to see whether the volume and quality is set nicely. If you run into any problems check out Audacity’s user guide for ideas.
The next thing you need to do is record your episode and add any introductions or music that you might have. You do that by simply going FILE > IMPORT and dragging it to the place you want it on the audio.
Saving (exporting) your first MP3
Once finished, hit FILE > EXPORT and then you’ll see a screen like the one above that asks you to fill out details.
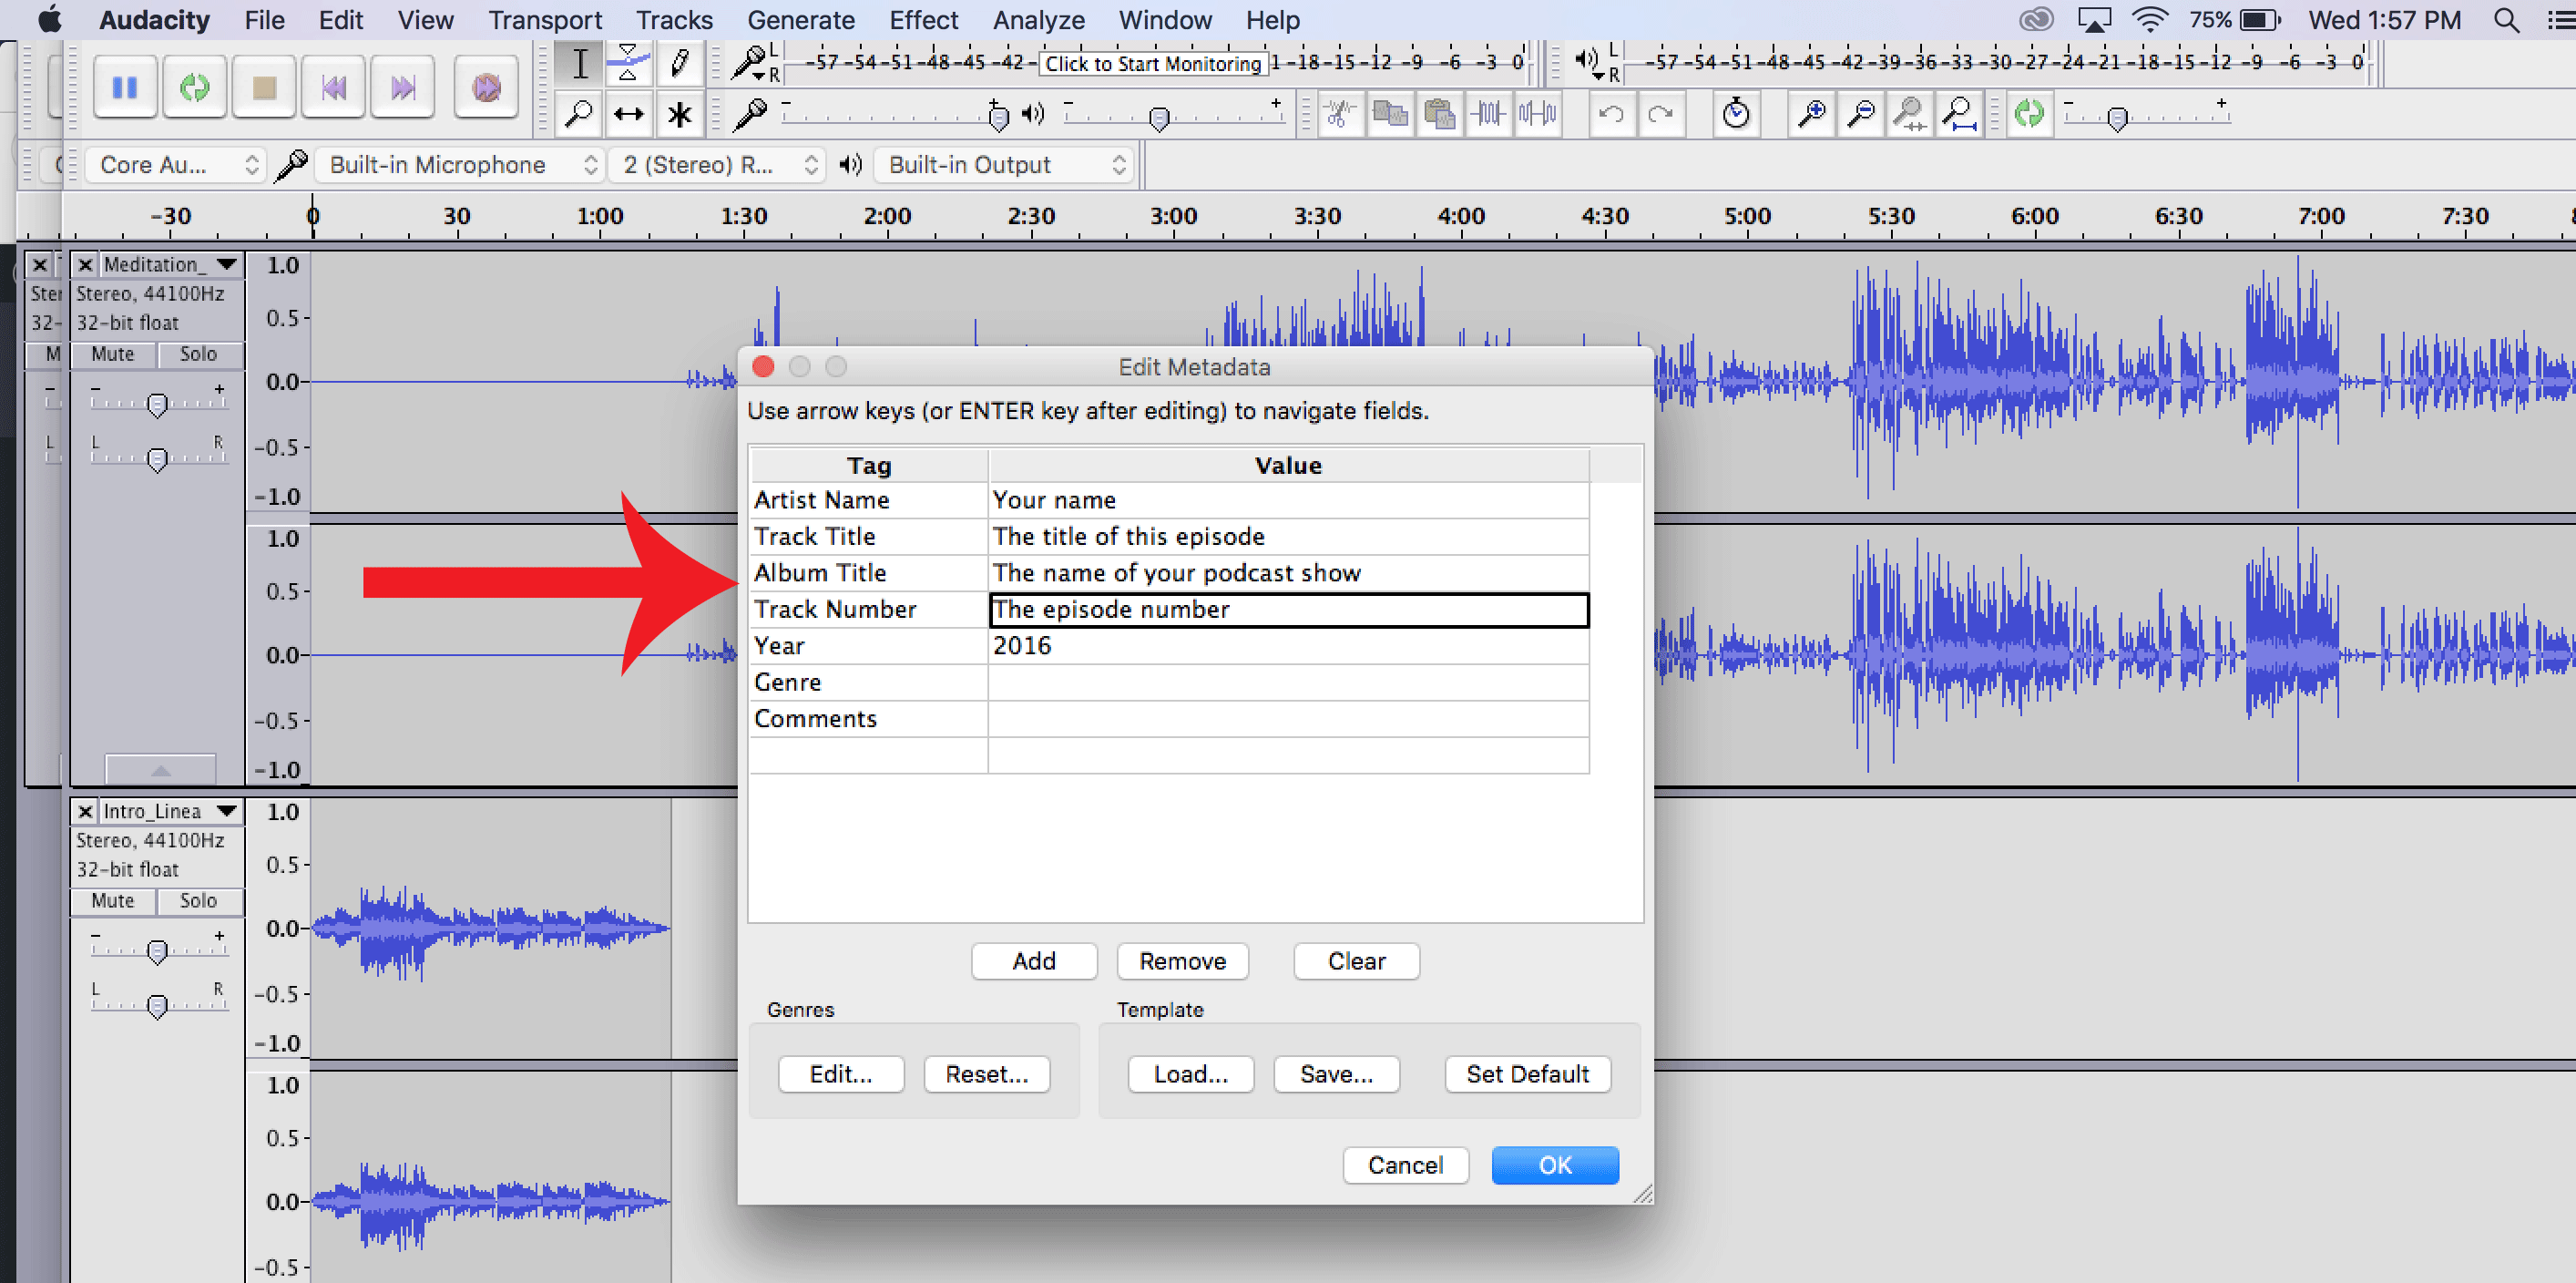
Exporting an MP3 file from Audacity
It’s important that you get these right as it will affect how your file displays in some formats. I’ve put some notes on the image above. Now your MP3 episode will be saved to your computer somewhere and is ready for uploading. If you like, you can listen to it on your desktop to check for any errors.
Uploading your MP3 to a file hosting service
The next step (we’re almost done!) is to upload that file to an MP3/podcasting service like Libsyn. As mentioned above, you don’t want to host these audio files on your blog because you could run into bandwidth issues if you get a lot of downloads. That’s the type of thing that causes your site to crash.
Libsyn is a great service because they don’t penalize you for getting lots of downloads. Instead of paying for bandwidth you pay for what you upload.
For example, for the $15 p/m plan gives you 250MB and you could upload around 2-3 podcasts a month.
This part is important.
Once you’ve chosen your plan, go to CONTENT > ADD FILE FOR DOWNLOAD ONLY > UPLOAD and then hit PUBLISH once you’ve selected your first episode MP3 file.
That will load for a while and then give you a URL of your MP3’s location online. We’re going to need that URL in a minute so leave that page open and/or copy the link.
It should look something like this:
http://traffic.libsyn.com/blogtyrant/blog_security.mp3
Publishing your first episode
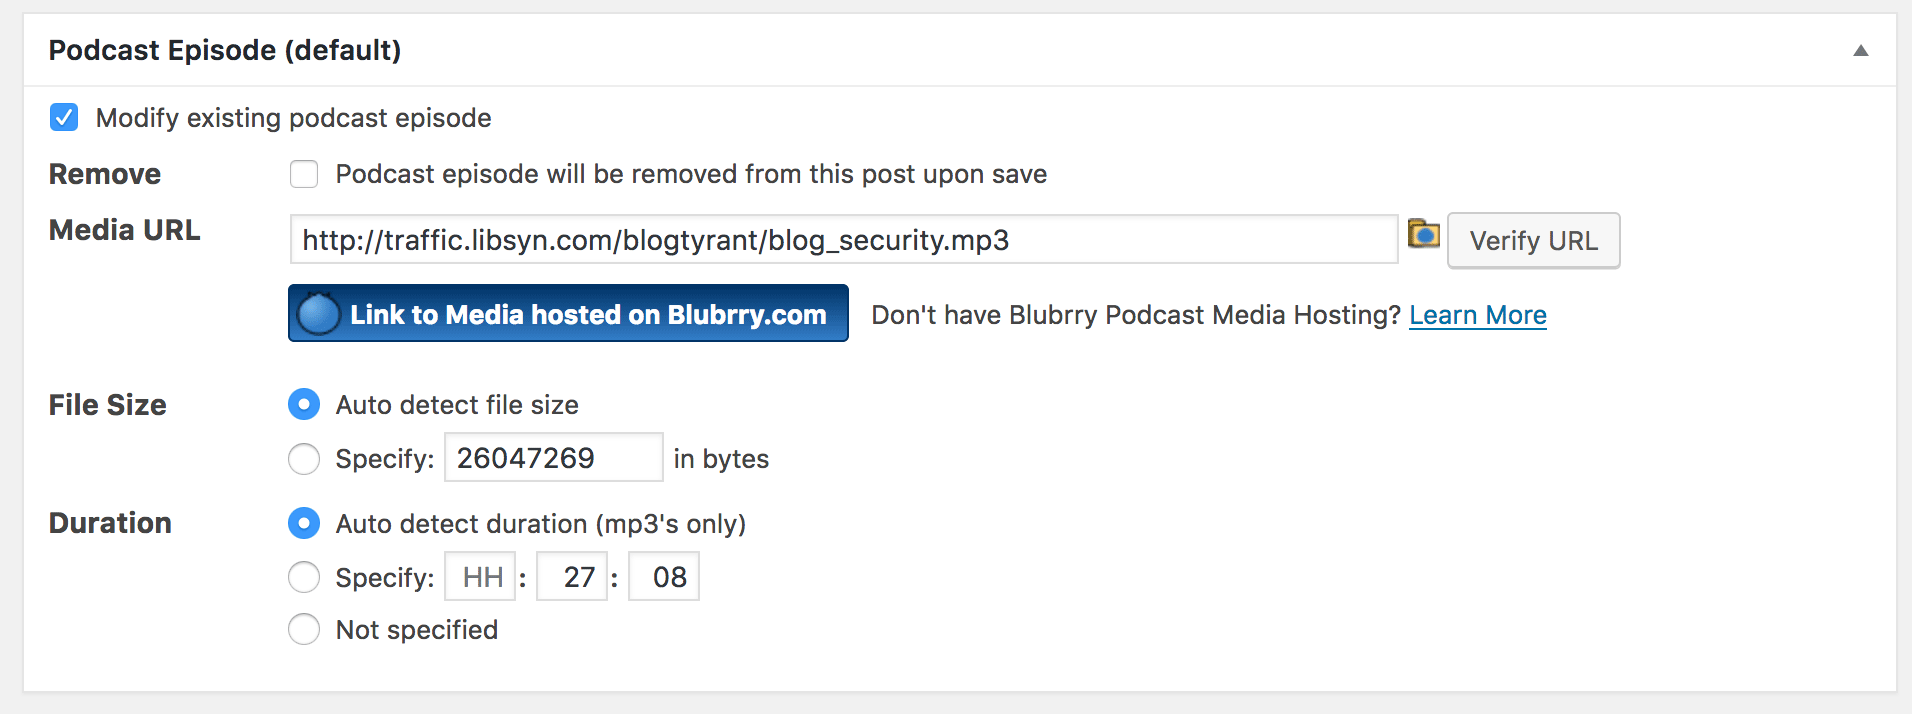
Now you need to head over to your blog and go to POSTS > ADD NEW and fill out the headline and body text. Your headline will be the title of this Podcast episode, and your body text will describe what the episode is about as well as including the player and podcasting shortcode.
If you’re not sure what to include in these posts just have a look at what other bloggers like Tim Ferriss do.
Creating your first episode.
Once you’ve done that, go ahead and paste that Libsyn URL from before into the section called Podcast Episode that will appear below your blog post’s content area. Click the Verify URL button as pictured above.
Finally, select the Podcast category, give it some tags and then when you’re all done hit Publish.
You’ve now published your first podcast episode!
6. Submit your podcast to iTunes
By this stage your podcast is live on your blog and all of your readers will be able to listen to it directly from the Powerpress button that appears in the blog post.
But what we really need to do is submit it to the world’s biggest podcasting search engine: iTunes.
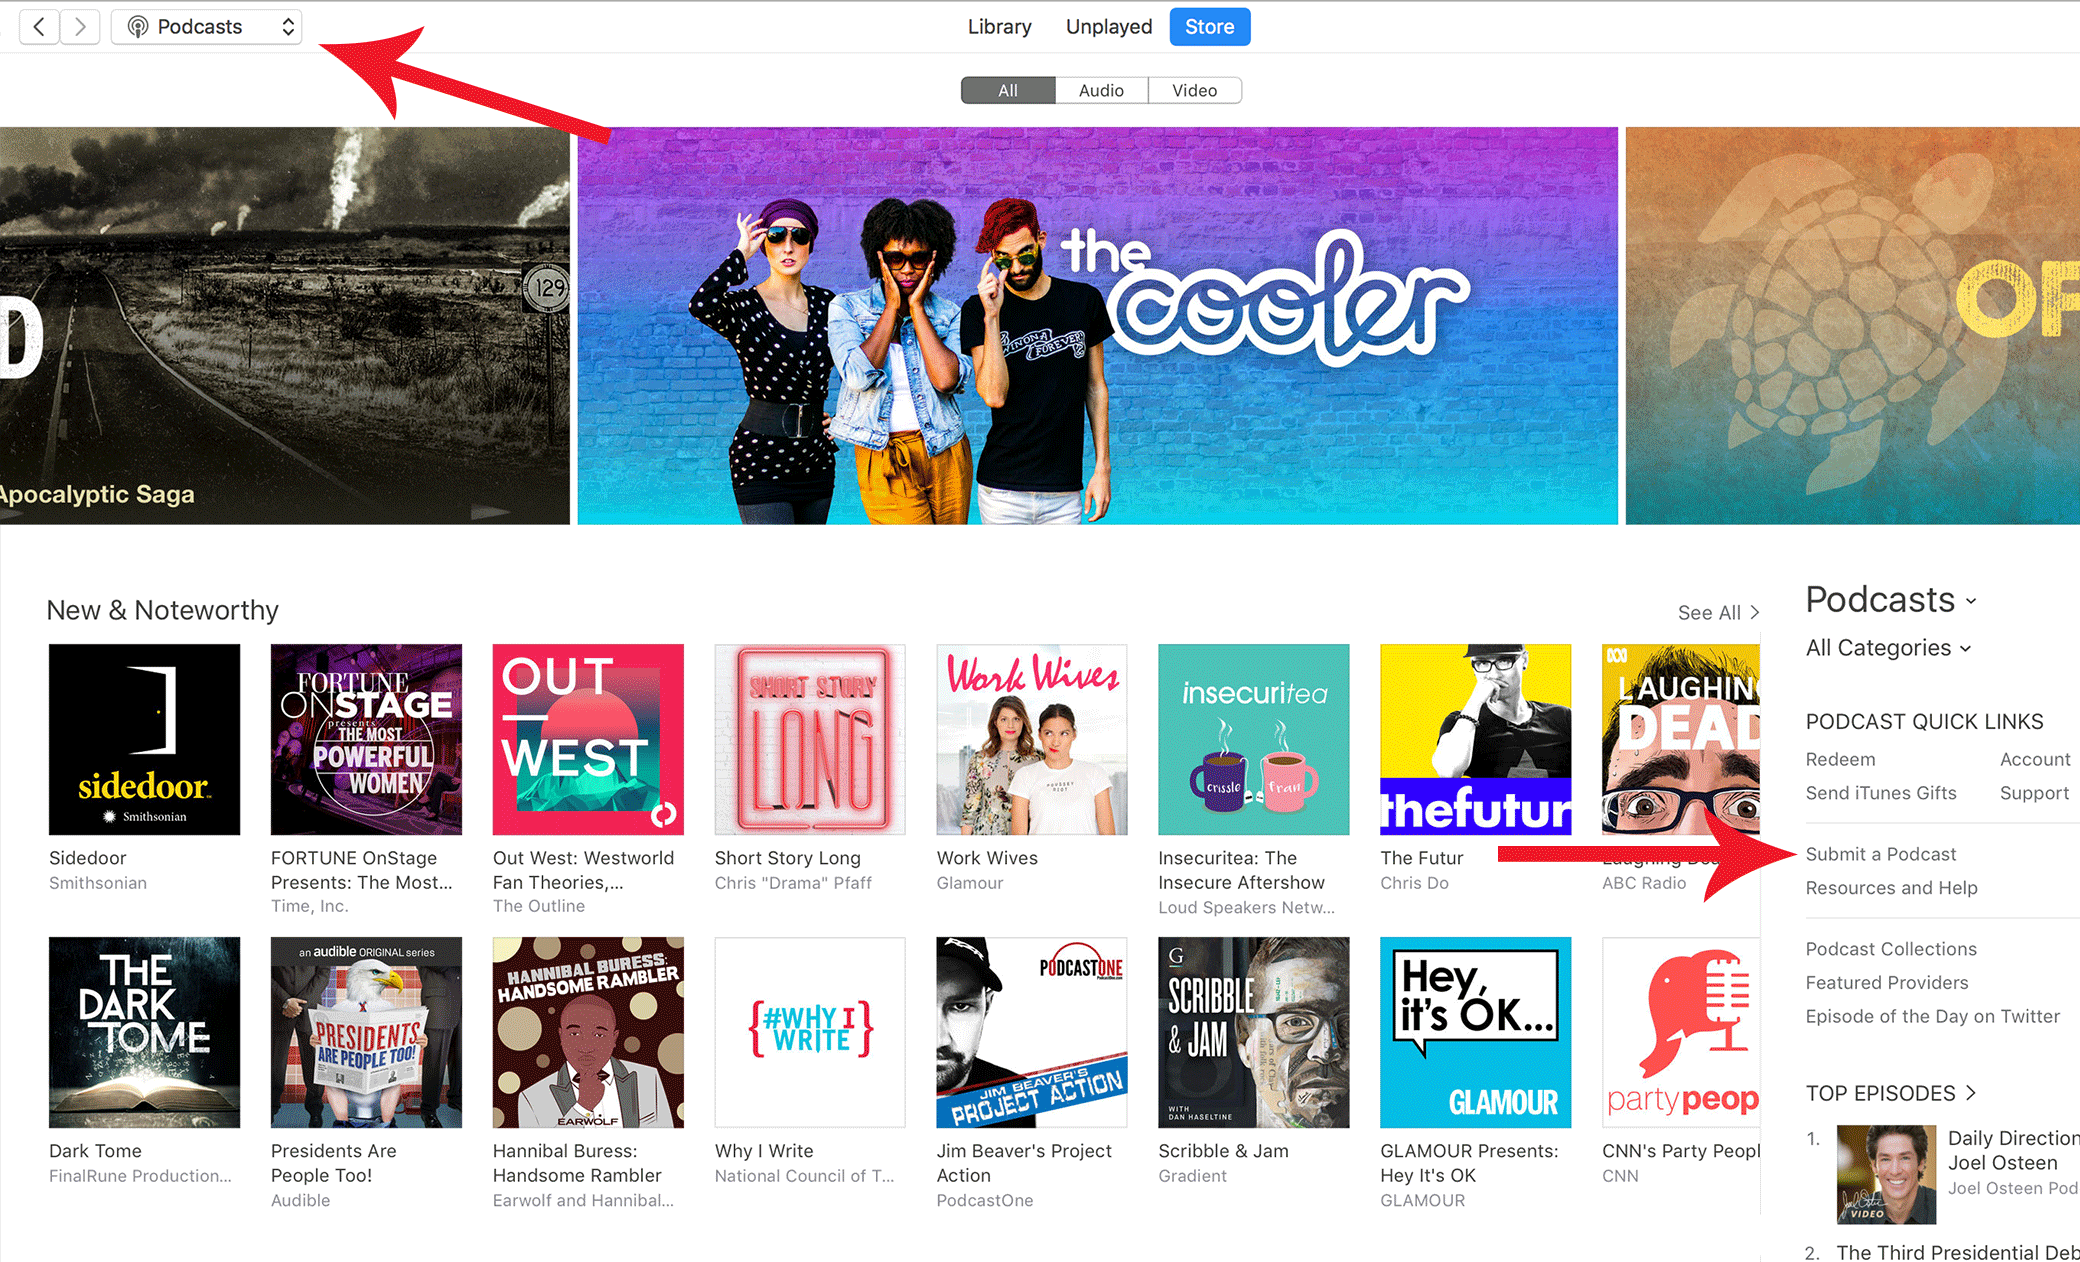
Submitting a podcast to iTunes for the first time.
To do this simply log into iTunes with the account that you want to be the “owner” of that podcast. Think carefully about which iTunes account that should be.
Then navigate to the Podcasts section at the top and find Submit a Podcast on the right hand side.
This will then take you to a new screen where it asks you some details and, most importantly, your Podcast Feed URL. This is the URL I showed you in the video above and can be found again by logging into your blog and going POWERPRESS > SETTINGS > FEEDS and then copying the podcast feeds URL.
Mine looks like this: http://www.blogtyrant.com/feed/podcast/
Once you’ve submitted that it will take a few hours or even days to show up in iTunes. Once you see it in there have a careful look at all the text and images and make sure it all looks good. If not, track back through the Powerpress plugin settings and make adjustments.
7. How to promote your blog’s podcast
Unfortunately, a lot of bloggers write incredible posts and then wonder why no one is visiting.
Well, the main reason is because they haven’t done any promotional activities.
Podcasting is exactly the same.
If you want to make sure that you get people listening you need to spend more time promoting it – more time even than you spend creating them!
- Network with other podcasters
One of the best ways to get your podcast known is by getting attention from other established podcasters. For example, follow all the top podcasts in your niche and make sure you interact on Twitter when new episodes come out. Help promote them and they might return the favor. - Pay for a mention
Advertising on podcasts is cheap and often very effective. Big shows like RadioLab will be out of reach financially, but there are lots of smaller shows that still have good reach and are looking for advertisers. Keep it in your niche and work with the founder to develop an ad that works. - Hype it on your mailing list
Hopefully if you have a blog you’ve also been building a mailing list and as such you can do a little promotional campaign that might involve some giveaways or a special release date. Don’t be afraid to ask for shares in this situation – if you’ve been providing value people won’t mind. - Ask your friends for reviews
When you first launch your podcast it’s a good idea to ask your friend and family to leave a 5-star review on iTunes. The more reviews you can get in the first few hours the more chance you have of hitting the New and Noteworthy section which can really boost your exposure. Ask nicely and give easy-to-follow instructions. - Align your podcast with popular events
A very successful promotional technique is to align your podcast with things that are going on in the world. For example, a lot of podcasts popped up around the time of the Star Wars movie release and had graphics and names that looked and sounded like Star Wars in some way. These shows get a lot of attention in search engines. For example, if you’ve done any episodes near the election with “Trump” in the title you’ll likely get some love from people searching for answers.
One of the big things to remember here is that it’s not likely that your podcast will be a massive smash hit right away. Sometimes it takes months and years of work to build up a loyal audience and get the traction that you were hoping for.
It’s also good to remember that sometimes opportunities arise from podacasting even when you don’t have a huge audience. It might just be a new business contact or a collaboration that takes place.
So, don’t discount it if you don’t have immediate success.
Bloggers, do you have a podcast?
This post covered quite a lot of information but also left quite a lot out.
I deliberately tried to make it a “broad strokes” type of thing instead of getting into too many details, but I’d love to know if I’ve missed anything really important that might impact someone trying to get started.
Please leave a comment below if you have any tips for someone wanting to start a podcast from their blog.
Podcasting Guide: How to Add a Killer Podcast to Your Blog originally posted at Blog Tyrant
No comments:
Post a Comment